本文地址:https://www.ebpf.top/post/bpfman_fedora_40
1. 背景
Fedora 40 提案建议将 bpfman 作为默认的程序管理器 ,开源项目 bpfman 可以实现对 eBPF 运行状态的深入了解,从而实现更轻松地管理 eBPF 程序(包括加载、卸载、运行状态查看等)。该提案还需要 Fedora 工程和指导委员会 (FESCo) 的批准,如果顺利很可能会在 4 月份出现在 Fedora 40 中以增强 eBPF 管理。
那么 bpfman 到底是一个什么样的项目呢?本文将带你简单了解 bpfman 及其工作原理。
2. bpfman 介绍
bpfman 早期名字为 bpfd,基于 Rust Aya 库开发,开发语言是 Rust。bpfman 项目用于简化 Kubernetes 集群或单主机上的 eBPF 程序的加载、卸载、修改和监控等。bpfman 项目由单机系统守护进程 bpfman、eBPF CRD、bpfman-agent 和 bpfman-operator 等构成,其中 CRD、bpfman-agent 和 bpfman-operator 都是围绕 Kubernetes 环境分布式部署的相关组件:
- bpfman:单主机的系统守护进程,对外提供 gRPC API,可支持 eBPF 程序加载、卸载、修改和监控;
- eBPF CRDS:提供两种类别的 CRD :部署 CRD 和 BPF 程序状态查看 CRD。部署相关 CRD (如 XdpProgram、TcProgram 等),用于加载不同类型的 eBPF 程序。程序状态查看类 CRD (BpfProgram),用于管理加载到内核的 eBPF 程序的运行状态;
- bpfman-agent:运行在 bpfman 守护进程的容器中,用于确保选择节点 eBPF 程序处于声明的状态;
- bpfman-operator:使用 Operator SDK 构建的 Operator,用于管理 Kubernetes 集群中 bpfman-agent 和 CRD 的安装和生命周期。
3. 单机部署流程
单机上部署 bpfman,其工作流程如下,其中 bpfman 二进制既可作为服务端部署也作为客户端程序使用。除了使用 bpfman 客户端程序外,用户也可以在用户空间的程序代码与 bpfman 服务端交互完各种管理操作:
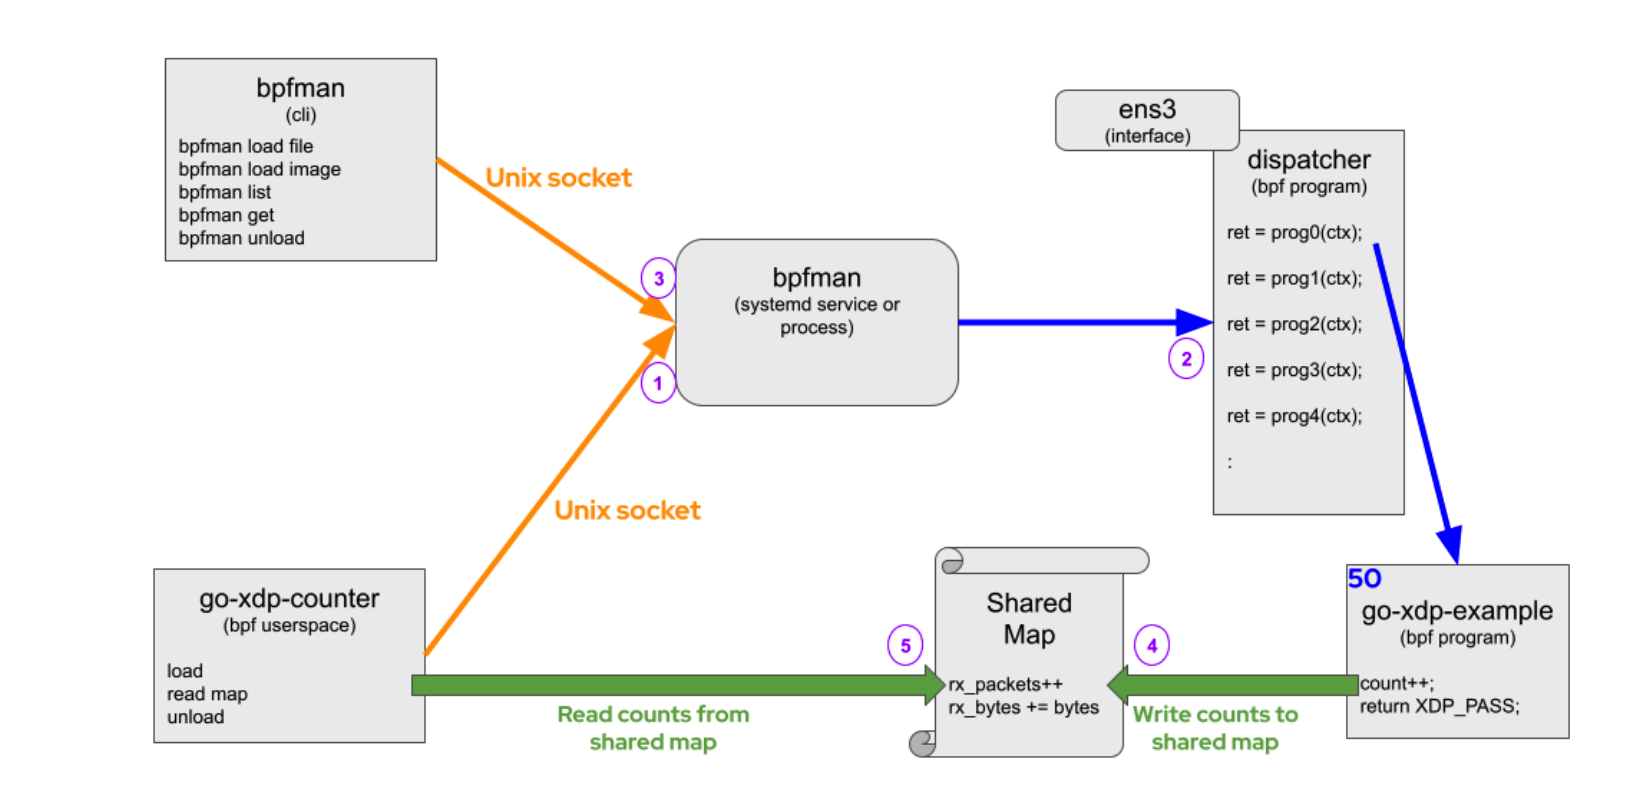
- 当 go-xdp-counter 用户空间启动时,其通过 unix 套接字向 bpfman 发送 gRPC 请求,请求 bpfman 加载位于磁盘上的 go-xdp-counter eBPF 字节码(bpfman/examples/go-xdp-counter/bpf_bpfel.o), 优先级为 50,程序作用与 ens3 接口;
- bpfman 接收到请求后,将加载对应的 eBPF 程序(go-xdp-counter),并返回运行的程序的 UUID;
- 用户可以通过 bpfman list 可用于显示系统管理的 eBPF 程序;
- 完成 eBPF 字节码(go-xdp-counter)加载工作后,触发运行的 eBPF 程序就会将数据包计数和字节计数写入共享 map 结构;
- go-xdp-counter 对应的用户空间程序定期从共享 map 中读取计数器并记录该值。
加载的字节码也可以是远程镜像的,如 sudo ./go-xdp-counter -iface ens3 -image quay.io/bpfman-bytecode/go-xdp-counter:latest,字节码的镜像需要有一定规范。
4. Kubernetes 集群部署流程
在 Kubernetes 集群分布式环境中部署和管理 eBPF 程序将更加复杂,bpfman 重点解决了以下挑战:
- 管理 eBPF 启用应用所需的权限和能力;
- 解决同一挂钩函数上多个 eBPF 程序的问题以及生命周期管理(特别是 xdp 模式下的多次挂载,内核默认不支持);
- 简化 Kubernetes 中的部署和程序生命周期的复杂性;
- 旨在安全性、可视性、多程序支持和生产力方面实现优化。
bpfman 在 Kubernetes 环境中管理 eBPF 程序可分为两个阶段:
- 运行在内核中的 eBPF 字节码程序管理;
- 与内核空间对应的 eBPF 用户空间程序的部署和数据读取,用户空间程序通常用于读取运行时数据或加载配置,需要单独部署用户空间程序(通过 CSI 方式挂载并读取数据)。
bpfman 在 Kubernetes 中部署和管理的流程图如下所示:

-
编写 CR 资源类型 XdpProgram ,定义部署机器标签、 eBPF 字节码相关的参数(例如接口、优先级和 BPF 字节码镜像等 )。本例中的 XdpProgram 资源名称是 go-xdp-counter-example。然后可使用 kbueclt apply -f bytecode.yaml 提交到集群生效。完整的 yaml 文件如下所示:
 1
 2
 3
 4
 5
 6
 7
 8
 9
10
11
12
13
14
15
16
17
|
# cat examples/config/base/go-xdp-counter/bytecode.yaml
apiVersion: bpfman.io/v1alpha1
kind: XdpProgram
metadata:
  labels:
    app.kubernetes.io/name: xdpprogram
  name: go-xdp-counter-example
spec:
  name: xdp_stats
  # Select all nodes
  nodeselector: {}
  interfaceselector:
    primarynodeinterface: true
  priority: 55
  bytecode:
    image:
      url: quay.io/bpfman-bytecode/go-xdp-counter:latest
|
-
bpfman-agent 运行在预期的节点上,监听对应的 CR 资源对象 XdpProgram。bpfman-agent 确保创建或修改的 XdpProgram 对象会生成一个对应 BpfProgram 对象。 BpfProgram 对象的名称是 XdpProgram 附加节点名称/接口/连接点信息的组合。
 1
 2
 3
 4
 5
 6
 7
 8
 9
10
11
12
13
14
15
|
$ kubectl get xdpprogram
NAME                     PRIORITY   DIRECTION
go-xdp-counter-example   55

$ kubectl get xdpprograms go-xdp-counter-example -o yaml
apiVersion: bpfman.io/v1alpha1
kind: XdpProgram
...
status:
  conditions:
  - lastTransitionTime: "2023-11-06T21:05:21Z"
    message: bpfProgramReconciliation Succeeded on all nodes
    reason: ReconcileSuccess
    status: "True"
    type: ReconcileSuccess
|
在上述对象 XdpProgram 的 staus 字段中,我们可以看到已经将程序成功分发到了目标节点。
-
bpfman-agent 通过 gRPC 调用 bpfman 来根据需要加载或卸载 eBPF 字节码程序。 bpfman 行为与单机运行示例中描述的相同。
-
最后,由 bpfman-agent 更新 BpfProgram 对象的状态。
 1
 2
 3
 4
 5
 6
 7
 8
 9
10
11
12
13
14
15
16
17
|
$ kubectl get bpfprograms
NAME                                                                                  AGE
go-xdp-counter-example-bpfman-deployment-control-plane-eth0                           60m

$ kubectl get go-xdp-counter-example-bpfman-deployment-control-plane-eth0 -o yaml
apiVersion: bpfman.io/v1alpha1
kind: BpfProgram
....
spec:
  type: xdp
status:
  conditions:
  - lastTransitionTime: "2023-11-06T21:05:21Z"
    message: Successfully loaded bpfProgram
    reason: bpfmanLoaded
    status: "True"
    type: Loaded
|
-
bpfman-operator 监视所有 BpfProgram 对象,并更新 XdpProgram 对象的状态,用户展示 eBPF 程序是否已应用于所对应的节点。
但是细心的读者有可能已经注意到,上述流程只是完成了 eBPF 字节码在内核中的加载(bpfman 充当了 eBPF 加载器),但是运行时暴露的数据和指标还未完成采集,因此还需要单独部署一个用户空间程序完成数据读取(上述图中为 map 数据结构)。
这里,我们需要单独部署了一个用户空间程序来消费 eBPF 计数器程序生成的 map 数据。bpfman 提供容器存储接口 (CSI) 驱动程序,用于将 eBPF map 暴露到用户空间容器中。为了避免必须将包含 map 固定文件的主机目录装载到容器中并强制容器具有访问该主机目录的权限,CSI 驱动程序将 map 装载到容器中的指定位置。
 1
 2
 3
 4
 5
 6
 7
 8
 9
10
11
12
13
14
15
16
17
18
19
20
21
22
23
24
25
26
27
28
29
|
#cat config/base/go-xdp-counter/deployment.yaml
---
apiVersion: apps/v1
kind: DaemonSet
metadata:
  name: go-xdp-counter-ds
  namespace: go-xdp-counter
  labels:
    k8s-app: go-xdp-counter
spec:
  :
  template:
    :
    spec:
       :
      containers:
      - name: go-xdp-counter
        :
        volumeMounts:
        - name: go-xdp-counter-maps                        <==== 2) VolumeMount in container
          mountPath: /run/xdp/maps                         <==== 2a) Mount path in the container
          readOnly: true
      volumes:
      - name: go-xdp-counter-maps                          <==== 1) Volume describing the map
        csi:
          driver: csi.bpfman.io                             <==== 1a) bpfman CSI Driver
          volumeAttributes:
            csi.bpfman.io/program: go-xdp-counter-example   <==== 1b) eBPF Program owning the map
            csi.bpfman.io/maps: xdp_stats_map               <==== 1c) Map to be exposed to the container
|
至此,我们介绍了在 Kubernetes 环境中使用 bpfman 部署 xdp 类型程序的完整流程,相对于单机部署,分布式环境中的管理更加复杂。
5. 总结
这里我们针对 bpfman 进行了简单介绍,更多的细节请参考 https://bpfman.io/。从我个人的使用和测试流程来看,以下几点个人体会:
-
bpfman 采用 Rust 开发,在云原生领域中略有些小众;
-
在 K8s 环境中 eBPF 加载和数据读取单独分离,通过 CSI 接口挂载,这里无论是从部署安装还是使用层面都有些不太流畅,未来可能会有更优的解法。
-
项目基于 libxdp 库实现了单接口多次 XDP 程序加载和 Daemonless 化的部署也算一个特色功能。
无论如何,bpfman 还是为单机或 Kubernetes 分布式环境管理分发 eBPF 程序提供了一个完整的架构实现,值得学习。
附录:bpfman 单机验证
在 Fedora 发行版中可直接通过 rmp 包安装。在 Ubuntu 系统中需要通过源码方式安装。
开发环境搭建
 1
 2
 3
 4
 5
 6
 7
 8
 9
10
11
12
13
14
15
16
17
18
19
20
21
22
|
$ curl --proto '=https' --tlsv1.2 -sSf https://sh.rustup.rs | sh
  stable-x86_64-unknown-linux-gnu installed - rustc 1.75.0 (82e1608df 2023-12-21)

.....
Rust is installed now. Great!

To get started you may need to restart your current shell.
This would reload your PATH environment variable to include
Cargo's bin directory ($HOME/.cargo/bin).

To configure your current shell, run:
source "$HOME/.cargo/env"

$  source "$HOME/.cargo/env"

$ rustup toolchain install nightly -c rustfmt,clippy,rust-src
...
info: installing component 'rustfmt'

  nightly-x86_64-unknown-linux-gnu installed - rustc 1.77.0-nightly (5518eaa94 2024-01-29)

info: checking for self-update
|
下载代码和编译 bpfman
 1
 2
 3
 4
 5
 6
 7
 8
 9
10
11
12
13
14
15
16
17
18
19
20
21
22
23
24
25
26
27
28
29
30
31
32
33
34
35
36
37
38
39
40
41
42
43
44
45
46
47
48
49
50
51
52
53
54
55
56
57
58
59
60
61
62
63
64
|
$ git clone https://github.com/bpfman/bpfman.git && cd bpfman
$ cargo xtask build-ebpf --libbpf-dir=/home/dave/test/libbpf-bootstrap-1/libbpf

# 构建 bpfman,编译成功后位于 ./target/debug/bpfman
$ cargo build

$ file ./target/debug/bpfman
./target/debug/bpfman: ELF 64-bit LSB pie executable, x86-64, version 1 (SYSV), dynamically linked, interpreter /lib64/ld-linux-x86-64.so.2, BuildID[sha1]=e3028a97943b1dafcadbd7c9e9c99d9fb49aa5fe, for GNU/Linux 3.2.0, with debug_info, not stripped


$ ./target/debug/bpfman --help
An eBPF manager focusing on simplifying the deployment and administration of eBPF programs.

Usage: bpfman <COMMAND>

Commands:
  load    Load an eBPF program from a local .o file
  unload  Unload an eBPF program using the program id
  list    List all eBPF programs loaded via bpfman
  get     Get an eBPF program using the program id
  image   eBPF Bytecode Image related commands
  system  Run bpfman as a service
  help    Print this message or the help of the given subcommand(s)

Options:
  -h, --help
          Print help (see a summary with '-h')

# 单机进程运行
$ RUST_LOG=info ./target/debug/bpfman system service --timeout 0

# 或者安装为系统服务
$ sudo ./scripts/setup.sh install
Copy CLI TAB Completion files:
  CLI TAB Completion files not generated yet. Use "cargo xtask build-completion" to generate.
Copy Manpage files:
  CLI Manpage files not generated yet. Use "cargo xtask build-man-page" to generate.
Copy binaries:
  Copying "../target/debug/bpfman" to "/usr/sbin"
Copy service files:
  Copying "bpfman.socket"
  Copying "bpfman.service"
  Starting "bpfman.socket"
Created symlink /etc/systemd/system/sockets.target.wants/bpfman.socket → /lib/systemd/system/bpfman.socket.


$ sudo  systemctl start bpfman
$ sudo systemctl status bpfman
● bpfman.service - Run bpfman as a service
     Loaded: loaded (/lib/systemd/system/bpfman.service; static)
     Active: active (running) since Tue 2024-01-30 16:10:28 CST; 2s ago
TriggeredBy: ● bpfman.socket
   Main PID: 1563623 (bpfman)
      Tasks: 23 (limit: 18814)
     Memory: 25.4M
        CPU: 237ms
     CGroup: /system.slice/bpfman.service
             └─1563623 /usr/sbin/bpfman system service

1 月 30 16:10:28 dave systemd[1]: Started Run bpfman as a service.
1 月 30 16:10:28 dave bpfman[1563623]: Log using journald
1 月 30 16:10:28 dave bpfman[1563623]: Has CAP_BPF: true
1 月 30 16:10:28 dave bpfman[1563623]: Has CAP_SYS_ADMIN: true
....
|
编译和加载 eBPF 程序
1
2
3
4
5
6
|
$ sudo apt-get install libbpf-dev
$ sudo go install github.com/cilium/ebpf/cmd/bpf2go@master

$ cd bpfman/examples/
$ make generate
$ make build
|
测试程序管理功能
1
2
3
4
5
6
7
|
# cd bpfman/examples/go-xdp-counter
# ./go-xdp-counter -iface lo
2024/01/31 19:28:25 Using Input: Interface=lo Priority=50 Source=/home/dave/bpfman/examples/go-xdp-counter/bpf_bpfel.o
2024/01/31 19:28:30 Program registered with id 1872
2024/01/31 19:28:33 153212 packets received
2024/01/31 19:28:33 9993784 bytes received
...
|
除了运行用户空间程序外,也可以使用 bpfman load 的方式加载(支持从镜像加载)。
我们可以在 bpfman 进程运行日志中查看到加载的日志:
 1
 2
 3
 4
 5
 6
 7
 8
 9
10
11
12
13
|
# RUST_LOG=info ./target/debug/bpfman system service --timeout 0
[INFO  bpfman::cli::system] Log using env_logger
[INFO  bpfman::cli::system] Has CAP_BPF: true
[INFO  bpfman::cli::system] Has CAP_SYS_ADMIN: true
[INFO  bpfman::serve] Using no inactivity timer
[INFO  bpfman::serve] Using default Unix socket
[INFO  bpfman::serve] Listening on /run/bpfman/sock/bpfman.sock
[INFO  bpfman::oci_utils::cosign] Starting Cosign Verifier, downloading data from Sigstore TUF repository

....
[INFO  bpfman::command] Loading program bytecode from file: /home/dave/bpfman/examples/go-xdp-counter/bpf_bpfel.o
[INFO  bpfman::oci_utils::cosign] The bytecode image: quay.io/bpfman/xdp-dispatcher:v2 is signed
[INFO  bpfman::bpf] Added xdp program with name: xdp_stats and id: 1872
|
可以使用 bpfman list 查看加载的程序:
1
2
3
|
# bpfman list
 Program ID  Name       Type  Load Time
 1872        xdp_stats  xdp   2024-01-31T19:28:30+0800
|
如果需要卸载则直接运行 bpfman unload 1872。
或通过 bpfman get pid 查看具体的执行详情:
 1
 2
 3
 4
 5
 6
 7
 8
 9
10
11
12
13
14
15
16
17
18
19
20
21
22
23
24
25
26
27
28
|
# bpfman get 1872
 Bpfman State
 Name:          xdp_stats
 Path:          /home/dave/bpfman/examples/go-xdp-counter/bpf_bpfel.o
 Global:        None
 Metadata:      None
 Map Pin Path:  /run/bpfman/fs/maps/1872
 Map Owner ID:  None
 Maps Used By:  1872
 Priority:      50
 Iface:         lo
 Position:      0
 Proceed On:    pass, dispatcher_return

 Kernel State
 ID:                               1872
 Name:                             xdp_stats
 Type:                             xdp
 Loaded At:                        2024-01-31T19:28:30+0800
 Tag:                              4d23a1d7f3618653
 GPL Compatible:                   true
 Map IDs:                          [468]
 BTF ID:                           598
 Size Translated (bytes):          168
 JITted:                           true
 Size JITted:                      104
 Kernel Allocated Memory (bytes):  4096
 Verified Instruction Count:       21
|